Creating a new subdomain: Difference between revisions
No edit summary |
m Added screenshots |
||
| Line 2: | Line 2: | ||
1. Log into your Bravenet account<br> | 1. Log into your Bravenet account<br> | ||
2. Click on the "Web Hosting" tab<br> | 2. Click on the "Web Hosting" tab | ||
3. Click on "Build a New Website"<br> | |||
4. Click "Use a subdomain"<br> | [[File:WebHostingTab.png|alt=Web Hosting Tab]] | ||
<br> | |||
3. Click on "Build a New Website" | |||
[[File:BuildNewWebsite.png|alt=Build New Website Button|139x139px]] | |||
<br> | |||
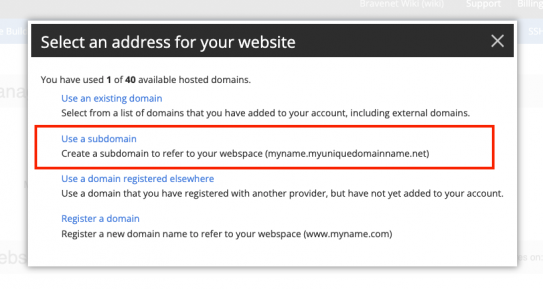
4. Click "Use a subdomain" | |||
[[File:Subdomain.png|543x543px]] | |||
<br> | |||
5. Enter the name you want to use<br> | 5. Enter the name you want to use<br> | ||
6. If you have your own domain name, select it in the dropdown menu<br> | 6. If you have your own domain name, select it in the dropdown menu<br> | ||
Latest revision as of 15:18, 22 June 2022
You can follow the directions below to create a new subdomain:
1. Log into your Bravenet account
2. Click on the "Web Hosting" tab
3. Click on "Build a New Website"
4. Click "Use a subdomain"
5. Enter the name you want to use
6. If you have your own domain name, select it in the dropdown menu
7. Click the 'create subdomain' button


