Ipswitch WS FTP Professional: Difference between revisions
No edit summary |
No edit summary |
||
| Line 2: | Line 2: | ||
Please note that we do not provide technical support nor official user support for this product - these instructions are strictly for our users' convenience when configuring WS_FTP Pro to connect to our servers. | Please note that we do not provide technical support nor official user support for this product - these instructions are strictly for our users' convenience when configuring WS_FTP Pro to connect to our servers. | ||
To watch an instructional video that walks through using WS FTP Pro, please see this YouTube video made by Bravenet: | To watch an instructional video that walks through using WS FTP Pro, please see this YouTube video made by Bravenet: | ||
Revision as of 11:12, 2 January 2015
WS_FTP Professional is a popular FTP/SFTP program, or Secure File Transfer Protocol. It is available for the Windows operating system for a free 30 day trial. After that you require a license to continue using the product. Alternative, indefinitely free options for FTP File Transfer are readily available by searching the net, but of course we would advise using a more secure, reliable product like WS_FTP Professional.
Please note that we do not provide technical support nor official user support for this product - these instructions are strictly for our users' convenience when configuring WS_FTP Pro to connect to our servers.
To watch an instructional video that walks through using WS FTP Pro, please see this YouTube video made by Bravenet:
Downloading WS_FTP Professional
WS_FTP Professional is a managed, secure File Transfer Protocol solution created and supported by IPSwitch. The WS_FTP program is available from the IPSwitch website at ipswitchft.com. You can download WS_FTP using the following instructions.
- 1) First, go to the WS_FTP homepage at ipswitchft.com/ws-ftp-client/.
- 2) Click the Download Free Trial button to download the WS_FTP Pro software.
- 3) Ipswitch asks you to submit a form. Fill in your email address, select your preferred language, and find your country from the dropdown box.
- 4) It will also ask how many licenses you'd like to purchase. You can select whatever you want for this, as the free trial does not require you to pay anything or even put in any payment information at any point.
- 5) Finally, click the Download Free Trial button to proceed with the download and installation.
- 6) Be sure to install the application once it's downloaded!
Setting up FTP
Before you can connect to any of your Bravenet services through a File Transfer Protocol, you will have to ensure you have FTP setup on your Bravenet account first.
- 1) First, log into your Bravenet user account at www.bravenet.com.
- 2) Click the FTP Accounts tab from the top of any Bravenet.com page.
- 3) If you have no FTP accounts created, select the "New SFTP Account" button.
- 4) Fill in a username and secure password in the popup box.
- 5) Optionally navigate to a path for this FTP account. This is the directory on the webserver the FTP account will open into by default. If left blank, it's path will be the root directory of your Bravenet account, giving it access to all websites and logfiles within that account.
- 6) Note: we urge users to not use Legacy FTP, and create and use only SFTP accounts.
- 7) When done, press the create sftp account button to finalize the FTP account.
Congratulations, you now have an FTP account that you can use to connect to your website with!
Creating a Connection in WS_FTP
With the hostname, username, and password of your FTP account at hand, you can run WS_FTP Professional and prepare to make a connection to your site.
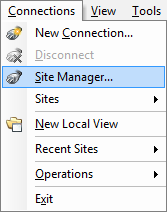
- 1) Click the Connections button from the top toolbar.
- 2) Click the Site Manager button from the dropdown.
- 3) Click the Create Site... button from the popup.
- 4) Proceed with the resulting dialogue, using any descriptive name for the Site Name. eg. My Website
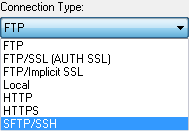
- 5) From the Connection Type page, select "SFTP/SSH" if your FTP account was an SFTP-only account. If your FTP Account has Legacy FTP enabled, you may also connect with just "FTP" as the connection type.
- 6) Use the "Server/Hostname" on the FTP Accounts page to fill in the Server Address when prompted in the dialogue.
- 7) Use the full username (including hyphen and numbers) and password when prompted by the dialogue.
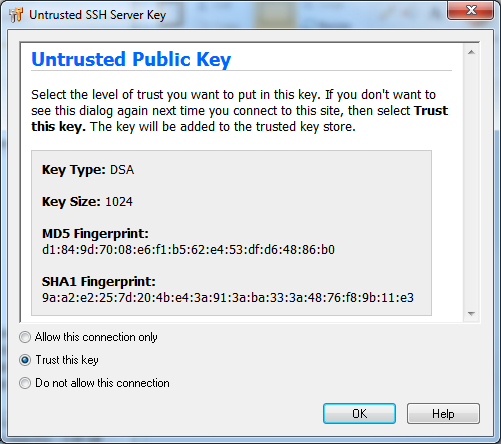
- 8) You may encounter a dialogue titled "Untrusted Public Key". If you do, select the Trust this key option and click OK to continue. This will allow WS_FTP Professional to remember that this FTP server is trusted.
Using FTP File Transfer
Detailed and specific instructions on using WS_FTP Professional's many useful features can be found in the official documentation available here: http://ipswitchft.force.com/kb/articles/FAQ/WS-FTP-Pro-Documents-and-Guides
Once you have WS_FTP Pro setup and have a connection made with an FTP account you can connect to it. The program will then be divided into approximately two halves; the left half, labelled "My Computer" or similar represents your local machine. The right pane represents the remote machine, or FTP server, that you have connected to.
You may navigate through the files of either computer, until you have found the folders you want. File transfers are affected by uploading/downloading it from the source folder on one machine to the destination folder on another machine. You can both upload from your local machine to the FTP server, and download from the FTP server to your local machine.
The two green arrow buttons separating the panes are the upload/download buttons which initiate actual file transfers.
You can also create, edit, and destroy folders on the remote machine from an FTP connection, allowing you to reorganize your folder and directory structure. Note that some folders can't be modified in certain ways, dependent on the permissions set on them.
When you're done affecting your desired file transfers, you may close the connection with the Disconnect button or by simply exiting out of the program itself.


