Microsoft Outlook 2007
You can find an instructional video we've created about Setting up Bravenet Email on Outlook 2007 at this link. Read below for the step-by-step instructions with examples, or refer to the video for a walkthrough of the procedure.
Note - this is for Microsoft Outlook, as it ships with Microsoft Office (it has a yellow icon). This does not include Outlook Express (blue and white icon), which is installed by default on Windows XP - see the Outlook Express for instructions.

- Start Microsoft Outlook 2007.
- Click on Tools.

- Click on Account Settings.

- Click on New.

- Select Microsoft Exchange, POP3, IMAP, or HTTP from the list, and then click Next.

- Select Manually configure server settings or additional server types, and then click Next.

- Select Internet E-mail from the options, and then click Next.

- Fill out the following fields:
- Your Name - enter your name here
- E-Mail Address - enter the Bravenet email address you are adding here
- Account Type - IMAP (or POP3), but we always suggest IMAP
- Incoming mail server - enter mail.bravehost.com
- Outgoing mail server - enter mail.bravehost.com
- User Name - enter your Bravenet email address
- Password - enter the password for the Bravenet email address
- Click the More Settings button.
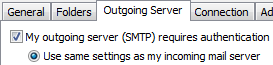
- Change to the Outgoing Server tab, and enable the My outgoing server requires authentication checkbox.
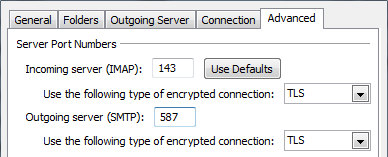
- Change to the Advanced tab, and change the Outgoing Server port number from 25 (the default) to 587
- Also ensure that Use the following type of encrypted connections is set to TLS. SSL will also work, but uses different port numbers.
- Click the OK button to close the advanced settings window, then click Next on the E-Mail Accounts window
- Click the Finish button on the next page and your account should now work correctly


Make sure to send a test email to another email address you have access to to verify that everything is set up correctly.